Showing posts with label recipe. Show all posts

Saturday, 29 August 2009

52 Weeks, 52 Chickens: Week One - Leftovers, hoisin chicken buns

I thought I'd see whether I could adapt a recipe I'd used and loved before - hoisin chicken buns from Cooking Light, by way of Cooking Cute. I tried it, and it worked well, although I'm always a bit funny about using leftover chicken and not cooking the hell out of it. I'm still alive, though... so I guess in that respect it was a complete and utter success. Maybe if I made this again, I'd heat the chicken before stuffing it in the bun, but it does get cooked again in the oven, so maybe that would be overkill.

Week One : Leftovers - Hoisin buns

To make this recipe, I made a batch of white bread dough, which is never any sweat with my bread maker. The original recipe calls for frozen dough, but I've never seen that before here in the UK - and it's just yeast, water, salt and flour after all, so easy to put together.

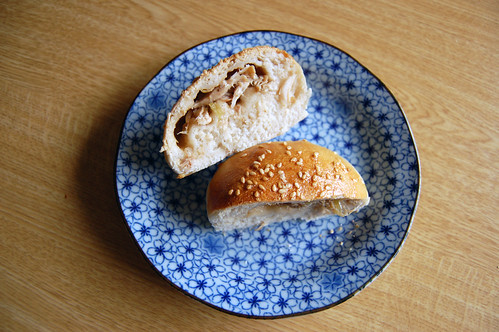
The filling I stripped from the chicken carcass - I must have used the meat from one leg and two thighs, plus whatever I pulled from underneath. Shred it up, then add it to 3 tbsp hoisin sauce, 1 tbsp oyster sauce, 2 tsp rice vinegar and a bunch of spring onions you've shredded finely. I also added salt to mine, but my hoisin sauce was that terrible cook-in sauce stuff, rather than the proper condiment you eat with duck. If you manage to pick up some real hoisin sauce (why was that so hard, Sainsbury's?) then you should reduce the amount you use down to 2 tbsp.

Hoisin buns on tray

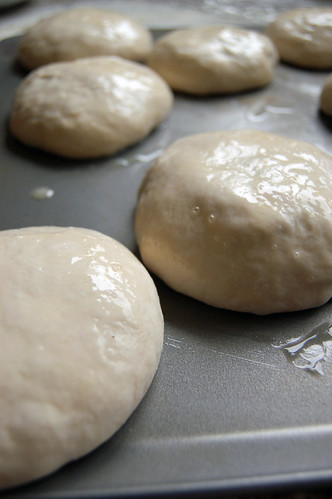
Once you've made your dough, turn it out and cut it into eight pieces (or more if you're making them for bento), and roll each piece into a size slightly bigger than your palm. Place a spoonful of the chicken mix into the middle. Pull four corners into the middle and pinch, then do the same again with the leftover tabs. It's helpful to rock the bun back and forth at this point to shape the top nicely. Set it on an oiled tray and put the rest together.

Hoisin buns on cooling rack

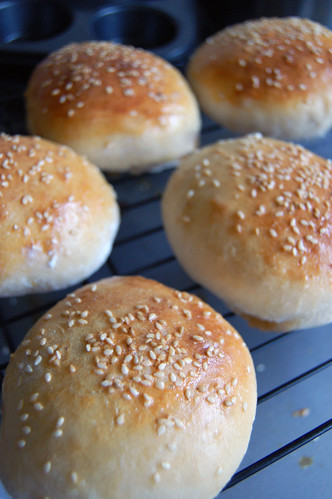
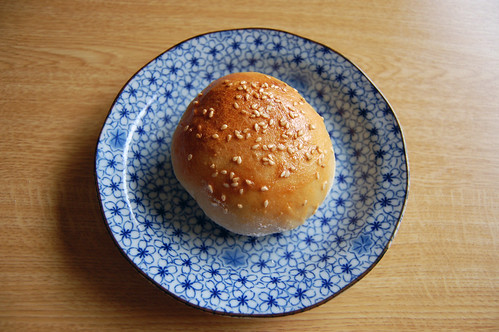
Cover and allow to prove for 20 mins in a warm place. Preheat your oven to 190C and then brush the buns with beaten egg and sprinkle with sesame seeds. Bake for 15 mins, or until golden. You can also bake them for a shorter amount of time (12 mins or so) and then freeze them to bake again another day. (There are great instructions here for freezing and then reheating the buns at Cooking Cute.)

Hoisin bun halved

Allow to cool slighty, then eat!

These also make a great lunch or snack, and can be eaten hot or cold. I really love these chicken buns! But, please make sure that everyone has one before you start to eat... unfortunately, the spring onions are a little whiffy. M ate one in the cinema the other day when we went to see Inglourious Basterds, and it didn't really help the atmosphere, I have to tell you.

In other news, I'm off to the farmer's market tomorrow to pick up my second chicken. Whoo! Wish me luck - I'm leaving really early so hopefully I can bag a good chook!

Wednesday, 26 August 2009

British bacon and asparagus sushi

Even though nobody cares but me, every so often I sort of get myself into this little crusade to link together British and Japanese cooking. Don't laugh, it's actually not completely far fetched. Did you know that some very essential Japanese sauces, like okonomiyaki and tonkatsu sauce, are based on Worcestershire sauce? Did you also know that curry rice came to Japan from India by way of British companies? Come on, you can't tell me you thought that brown gloop came from anywhere but the UK...

So, every so often I come up with something that's sort of Japanese, but using British ingredients, and it's never worked so well as it did with this scattered sushi recipe. It's really simple, and it's really good - and it's great for hot summer days, too. Probably one of the main reasons this works is because the vinegar in the sushi rice dressing mimics the acidity of tomato ketchup. Hey, whatever it is, it tastes lovely.


2 cups Japanese rice (around 430g)
6tbsp sushi rice vinegar (or check label)
1 tbsp sake (optional)
1 piece dried konbu (optional)
2 eggs
1 egg yolk
2 tsp cornflour
Large pinch salt
Pinch sugar
Vegetable oil
Packet streaky bacon (smoked or unsmoked - your choice!)
500g asparagus tips

Make your sushi rice – I recommend you buy a rice cooker, as it takes all of the guesswork and stress out of cooking rice.

Firstly, wash the rice thoroughly and leave it to soak for half an hour. Then, drain and add your sushi rice to the same quantity of water in your rice cooker. Add the sake and konbu if using, then switch on and leave to cook. Once it has finished, leave it to rest for 15 minutes.

Turn the rice out into a damp, flat container (like a pyrex oven dish) and add the sushi rice vinegar. Using a damp wooden spoon, turn the rice gently to coat it in the seasoning. At the same time, fan the rice to cool it and help it to absorb the dressing. Continue until no visible steam rises from the rice, and place it under a damp kitchen towel.

Make thin Japanese omelettes by combining the eggs, egg yolk, salt and sugar in a bowl. Add the cornflour dissolved in 4 tsp water. Heat the oil in a frying pan, and add enough oil to coat the base. Thinly cover the pan with the egg, and heat until almost set. Then, turn the omelette over to finish it off. Do not allow it to colour. Continue until all the egg has been cooked, then roll the omelettes up and shred them finely.

Fry the bacon until very crispy. Snip into small pieces.

Steam the asparagus, and when cooked, remove the tips and slice the stems into small coins.

Divide the rice into four bowls, and top with the bacon, asparagus and omelette.

There you go, a summery fry-up. Well, sort of.

Monday, 24 August 2009

Salt-baked chicken

I've always wanted to try this dish, and it was absolutely amazing. I bought a corn-fed chicken and it made a huge difference. The chicken was fantastic - so tender and moist. Honestly, I never thought it would come out that well, but I was wrong! The only downside is that it was really hard to get a hold of the right amount of sea salt at a reasonable price.


Also, try the dipping sauce, it is amazing. There's really no other word for it.

Chicken, weighing approximately 1.6kg
1 tsp fine salt
3kg coarse salt, or more, depending on your pan
Bunch spring onions
Large piece fresh ginger
2 tsp sugar
Pinch salt
4 tbsp cooking oil
Steamed pak choi, to serve
Cooked rice, to serve

Wash the chicken thoroughly inside and out. Sprinkle 1 tsp of fine salt in the cavity of the chicken and rub in. Add an inch of smashed ginger and one spring onion to the cavity. You can also add dried tangerine peel.

Select a heavy bottomed saucepan with a lid which is slightly larger than your chicken. Ensure that there is not an excess of space around the chicken, as you will need to use extra salt to cover the space.

Place the salt in the saucepan and allow to heat for five minutes, until slightly browned and smoking. Remove half of the salt and nestle the chicken on the top layer of the salt, then pour the rest over to cover. Cover the chicken and cook over a low heat for 10 minutes. Then, remove the pan and place it in a pre-heated oven at 200c or gas mark 6. Cook for 45-60 minutes, or until the juices run clear.

Remove the chicken from the salt, and brush off the excess, and rinse before allowing to cool for 20 minutes. Then, chop the chicken into bite-sized pieces. The traditional Chinese method is to cut straight through the bone of the chicken, but you may wish to remove the bones to serve.

To make the dipping sauce, peel and grate the remaining ginger, and finely chop the spring onions. Heat the oil in a pan until smoking, then pour the oil onto the ginger and spring onions – make sure you use a heat proof bowl for this! Mix in the sugar and salt to taste.

To serve, plate the chicken and allow diners to help themselves, dipping the chicken into the sauce and alternating between the accompaniments of steamed pak choi and rice.


I'm not going to lie, it was scary. It was fiddly. It was pretty expensive. It involved a lot of trial and error, and also I'm still not totally sure about the best way to cover the chicken economically, but I would so do it again. It was that delicious.